
| 일 | 월 | 화 | 수 | 목 | 금 | 토 |
|---|---|---|---|---|---|---|
| 1 | 2 | 3 | ||||
| 4 | 5 | 6 | 7 | 8 | 9 | 10 |
| 11 | 12 | 13 | 14 | 15 | 16 | 17 |
| 18 | 19 | 20 | 21 | 22 | 23 | 24 |
| 25 | 26 | 27 | 28 | 29 | 30 | 31 |
- 자바 인터뷰
- 자바 기술면접
- Java tech interview
- 맥북 필수 앱
- react jsx
- Node.js Express
- 맥북 유용한 앱
- 백준
- 백준 알고리즘
- 자바 영어면접
- mysql
- jsx 문법
- 맥북 초보
- 아톰에디터
- 생활코딩
- node.js
- 리액트
- 자바 면접
- react state
- 맥북 팁
- 알고리즘
- 백준 단계별로 풀어보기
- 맥북 사용법
- Express middleware
- AtomEditor
- 기술면접
- tech interview
- React
- React props
- 자바 개발자
- Today
- Total
song.log
[MySQL] Node.js MySQL 모듈의 기본 사용법, MySQL로 CRUD기능 구현 본문
1. VScode를 통해 Node.js - MySQL 연동
먼저 VScode의 Terminal에서 mysql monitor에 접속
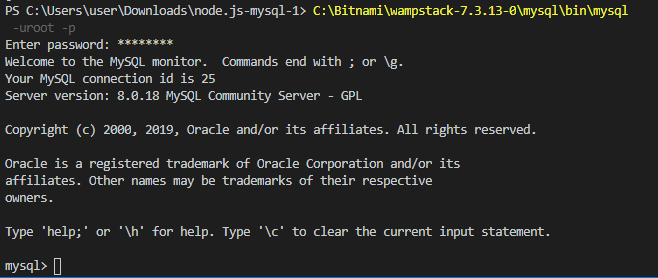
이후 작업은 터미널을 왔다갔다 하면서 사용할 수 있게 된다.
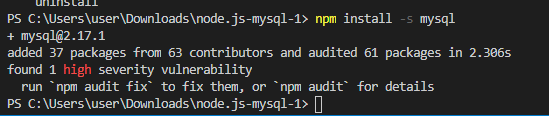
mysql npm을 설치
npm install -s mysql여기서 -s를 붙이는 이유는 dependencies 목록에 추가하기 위함

nodejs > mysql.js 파일을 생성 mysql을 연동하기 위한 코드작성
var mysql = require('mysql');
var conn = mysql.createConnection({
    host     : 'localhost',
    user     : 'root',
    password : 'password',
    database : 'example'
});

conn.connect();

conn.query('SELECT * FROM  topic',function(err,results,fields){
    if(err){
        console.log(err);
    }
    console.log(results);
});

conn.end();
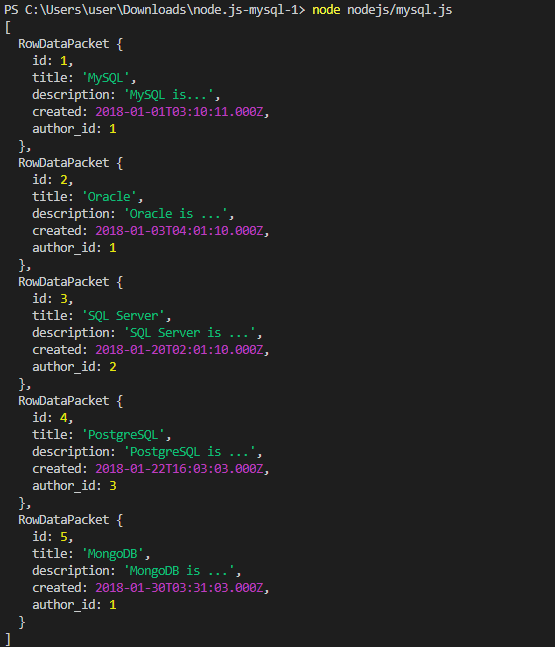
생성한 파일을 실행하면 검색한 테이블 안의 데이터가 객체화되어 출력된다.
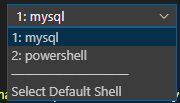
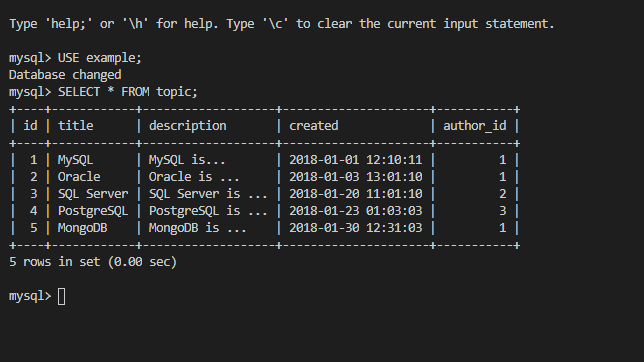
Teminal을 mysql로 바꿔서 select 쿼리문을 작성해 검색하면 테이블의 형태로 나온다.
2. MySQL로 글 생성, 검색, 수정, 삭제(CRUD) 기능 구현
MySQL 모듈을 가져와서 데이터베이스를 연결
var mysql = require('mysql');
var db = mysql.createConnection({
    host     : 'localhost',
    user     : 'root',
    password : 'password',
    database : 'example'
});
db.connect();
[검색]
데이터베이스안의 리스트를 가져오기 위해서 SELECT문으로 리스트 불러오기
먼저 리스트만 가져오고 기본 홈페이지를 보이게끔 하는 코드 작성
db.query(`SELECT * FROM topic`, function(err, topics){
          var title = 'Welcome';
          var description = 'Hello, Node.js';
          var list = template.list(topics);
          var html = template.HTML(title, list,
            `<h2>${title}</h2>${description}`,
            `<a href="/create">create</a>`
          );
          response.writeHead(200);
          response.end(html);
        });
이 때, 템플릿 파일을 수정할 필요가 있다. topics에서 어떤식으로 가져오는지를 수정
module.exports = {
  HTML:function(title, list, body, control){
    return `
    <!doctype html>
    <html>
    <head>
      <title>WEB1 - ${title}</title>
      <meta charset="utf-8">
    </head>
    <body>
      <h1><a href="/">WEB</a></h1>
      ${list}
      ${control}
      ${body}
    </body>
    </html>
    `;
  },list:function(topics){
    var list = '<ul>';
    var i = 0;
    while(i < topics.length){
      list = list + `<li><a href="/?id=${topics[i].id}">${topics[i].title}</a></li>`;
      i = i + 1;
    }
    list = list+'</ul>';
    return list;
  }
}
리스트의 링크를 클릭했을 때 해당하는 id로 데이터를 가져와서 뿌려주는 코드
db.query(`SELECT * FROM topic`, function(error,topics){
         if(error){
           throw error;
         }
         db.query(`SELECT * FROM topic WHERE id=?`,[queryData.id], function(error2, topic){
           if(error2){
             throw error2;
           }
          var title = topic[0].title;
          var description = topic[0].description;
          var list = template.list(topics);
          var html = template.HTML(title, list,
            `<h2>${title}</h2>${description}`,
            ` <a href="/create">create</a>
                <a href="/update?id=${queryData.id}">update</a>
                <form action="delete_process" method="post">
                  <input type="hidden" name="id" value="${queryData.id}">
                  <input type="submit" value="delete">
                </form>`
          );
            response.writeHead(200);
            response.end(html);

          });
        });
[생성]
form으로 받아온 데이터를 INSERT문으로 데이터 추가
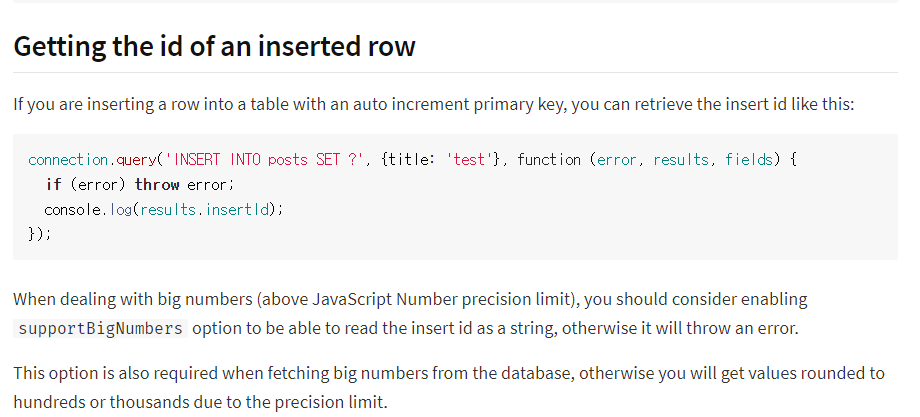
여기서 기억해야하는 것은 추가하는 id를 가져올 때 ${result.insertId}로 가져오는 것이다.
자세하게 알아보기 위해선 : https://www.npmjs.com/package/mysql#getting-the-id-of-an-inserted-row
 else if(pathname === '/create'){
      db.query(`SELECT * FROM topic`, function(err, topics){
        var title = 'WEB - create';
        var list = template.list(topics);
        var html = template.HTML(title, list, `
        <form action="/create_process" method="post">
          <p><input type="text" name="title" placeholder="title"></p>
          <p>
            <textarea name="description" placeholder="description"></textarea>
          </p>
          <p>
            <input type="submit">
          </p>
        </form>
      `, '');
      response.writeHead(200);
      response.end(html);
      });
    } else if(pathname === '/create_process'){
      var body = '';
      request.on('data', function(data){
          body = body + data;
      });
      request.on('end', function(){
          var post = qs.parse(body);
          db.query(`INSERT INTO topic(title, description, created, author_id) VALUES(?, ?, NOW(), ?)`,
          [post.title, post.description, 1],
          function(err, result){
            if(err){
              throw err;
            }
            response.writeHead(302, {Location: `/?id=${result.insertId}`});
            response.end();
          });
      });
    }
[수정 / 삭제]
클릭된 id를 가지고 와서 데이터를 수정해주거나 삭제하는 것이 가능하다.
else if(pathname === '/update'){
      db.query(`SELECT * FROM topic`, function(err,topics){
          if(err){
            throw err;
          }
        db.query(`SELECT * FROM topic WHERE id = ?`, [queryData.id], function(err2, topic){
          var title = topic[0].title;
          var description = topic[0].description;
          var list = template.list(topics);
          var html = template.HTML(title, list,
            `
            <form action="/update_process" method="post">
              <input type="hidden" name="id" value="${queryData.id}">
              <p><input type="text" name="title" placeholder="title" value="${title}"></p>
              <p>
                <textarea name="description" placeholder="description">${description}</textarea>
              </p>
              <p>
                <input type="submit">
              </p>
            </form>
            `,
            `<a href="/create">create</a> <a href="/update?id=${queryData.id}">update</a>`
          );
          response.writeHead(200);
          response.end(html);
        })

      });
    } else if(pathname === '/update_process'){
      var body = '';
      request.on('data', function(data){
          body = body + data;
      });
      request.on('end', function(){
          var post = qs.parse(body);
          db.query(`UPDATE topic SET title = ?, description = ? WHERE id = ?`, [post.title, post.description, post.id], function(err, result){
            response.writeHead(302, {Location: `/?id=${post.id}`});
              response.end();
          });
      });
    }
 else if(pathname === '/delete_process'){
      var body = '';
      request.on('data', function(data){
          body = body + data;
      });
      request.on('end', function(){
          var post = qs.parse(body);
          db.query(`DELETE FROM topic WHERE id = ?`,[post.id],function(err,result){
            if(err){
              throw err;
            }
            response.writeHead(302, {Location: `/`});
            response.end();
          });

      });
    }
참조한 생활코딩 URL :
https://opentutorials.org/module/3560/21185
https://opentutorials.org/module/3560/21186
https://opentutorials.org/module/3560/21187
https://opentutorials.org/module/3560/21188
https://opentutorials.org/module/3560/21189
https://opentutorials.org/module/3560/21190
'DevLog > MySQL' 카테고리의 다른 글
| [MySQL] Workbench 설치 & 사용법 (0) | 2019.12.30 |
|---|---|
| [MySQL] Schema(스키마), Table(테이블) 생성 (0) | 2019.12.30 |
| [MySQL] MySQL 설치 방법(공식사이트/bitnami), MySQL의 구조, 서버접속 (0) | 2019.12.30 |


